Findings
Creating findings, the draft → review → QA workflow, CVSS scoring, classifications, comments, and retesting.
A finding is where the actual work of an engagement lives: a single issue, written up, scored, and walked through review before it ever reaches a client. This page covers creating one, the review workflow it moves through, and what happens when you retest it later.
The findings list
Section titled “The findings list”An engagement’s Findings tab lists its findings with severity, CVSS score, review stage, and the assigned reviewer and QA. Filter by severity and review stage, search by title or CVE ID, or tick Needs me to see only the findings waiting on you.
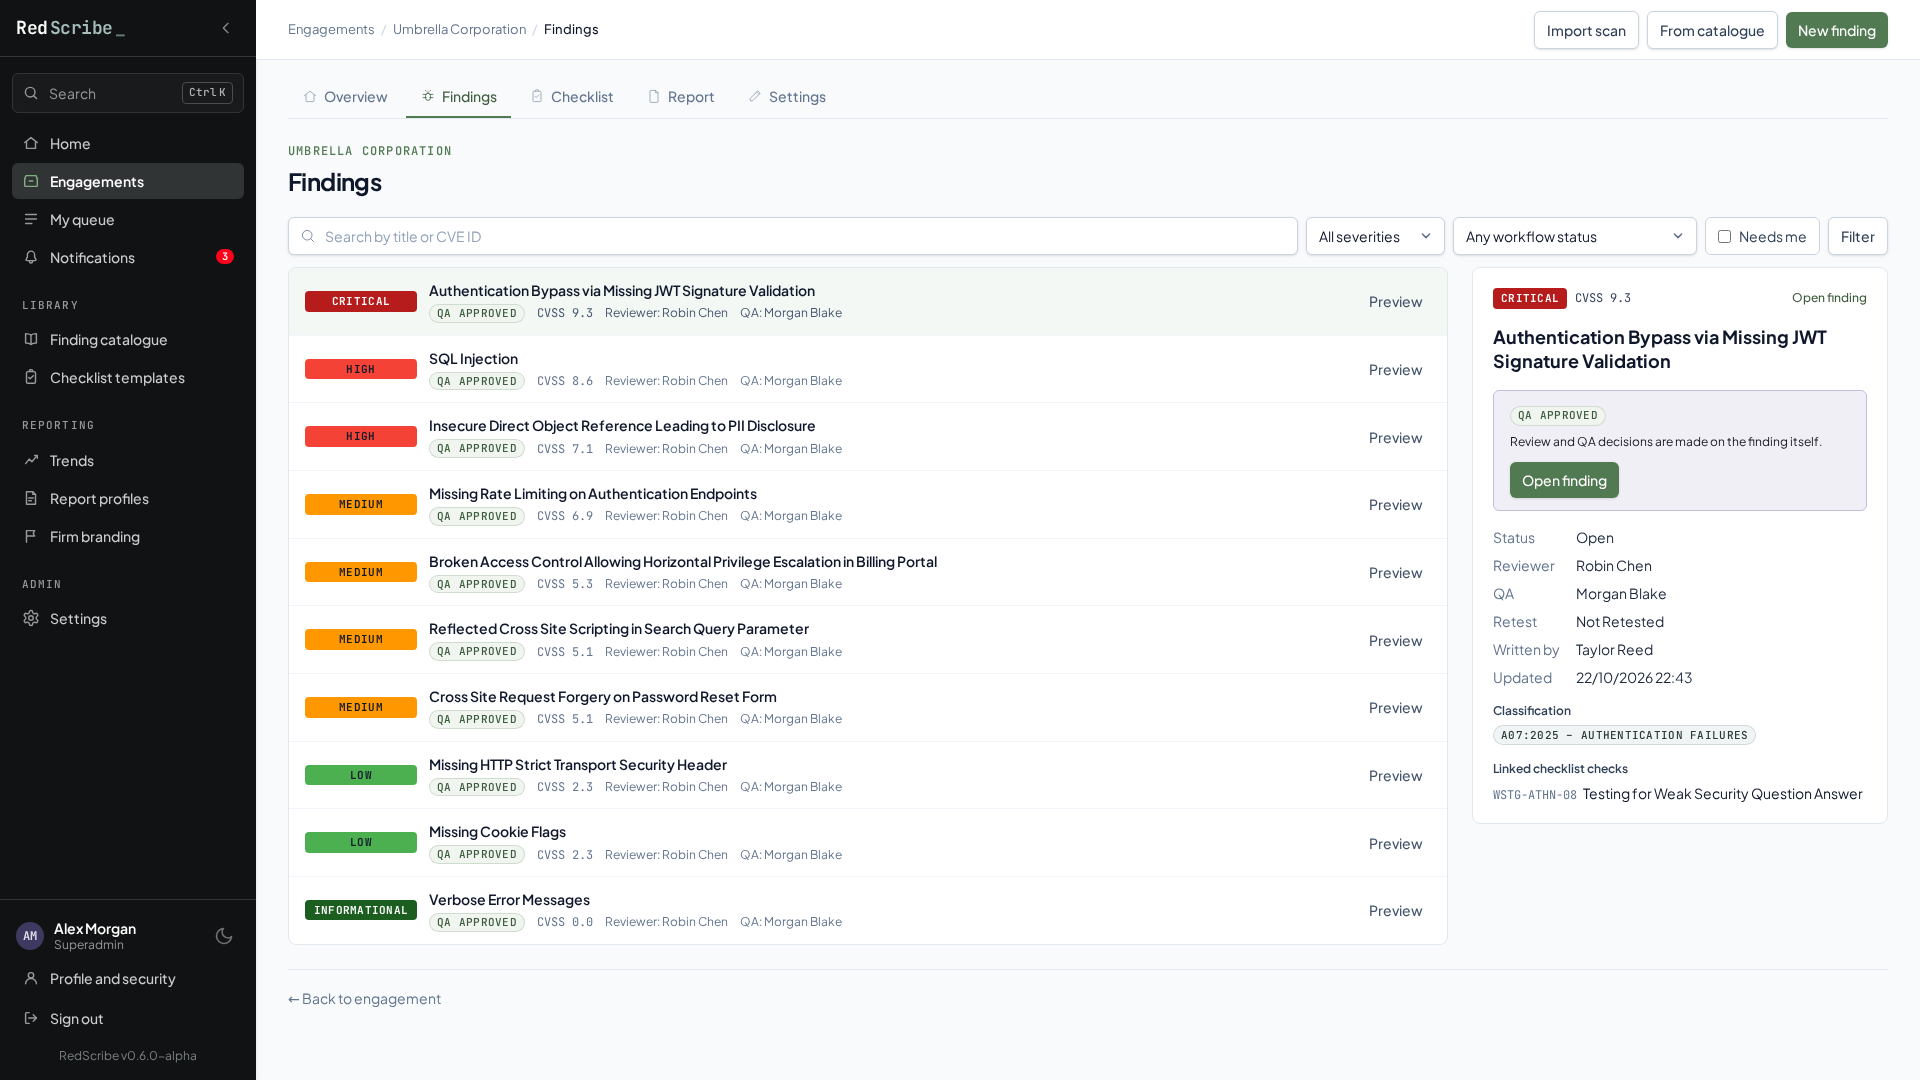
Preview on a row shows that finding’s details alongside the list, so you can scan several without leaving the page; Open finding goes to the full page. When findings are waiting for a reviewer or QA, panels above the list assign one person to all of them at once.
Creating a finding
Section titled “Creating a finding”From an engagement’s Findings tab, select New finding. You can also start from somewhere else:
- From catalogue opens the approved finding catalogue entries; Use template on one starts a finding pre-filled from it. The finding remembers which entry it came from (“Started from catalogue entry”), but it’s a copy: later changes to the entry don’t change the finding.
- + Raise from this check on a checklist item starts a finding from that check and links the two when you save.
- Scanner import creates Draft findings from Nmap, Burp Suite, or Nuclei results.
Nothing stops you editing a pre-filled finding further.
What you fill in
Section titled “What you fill in”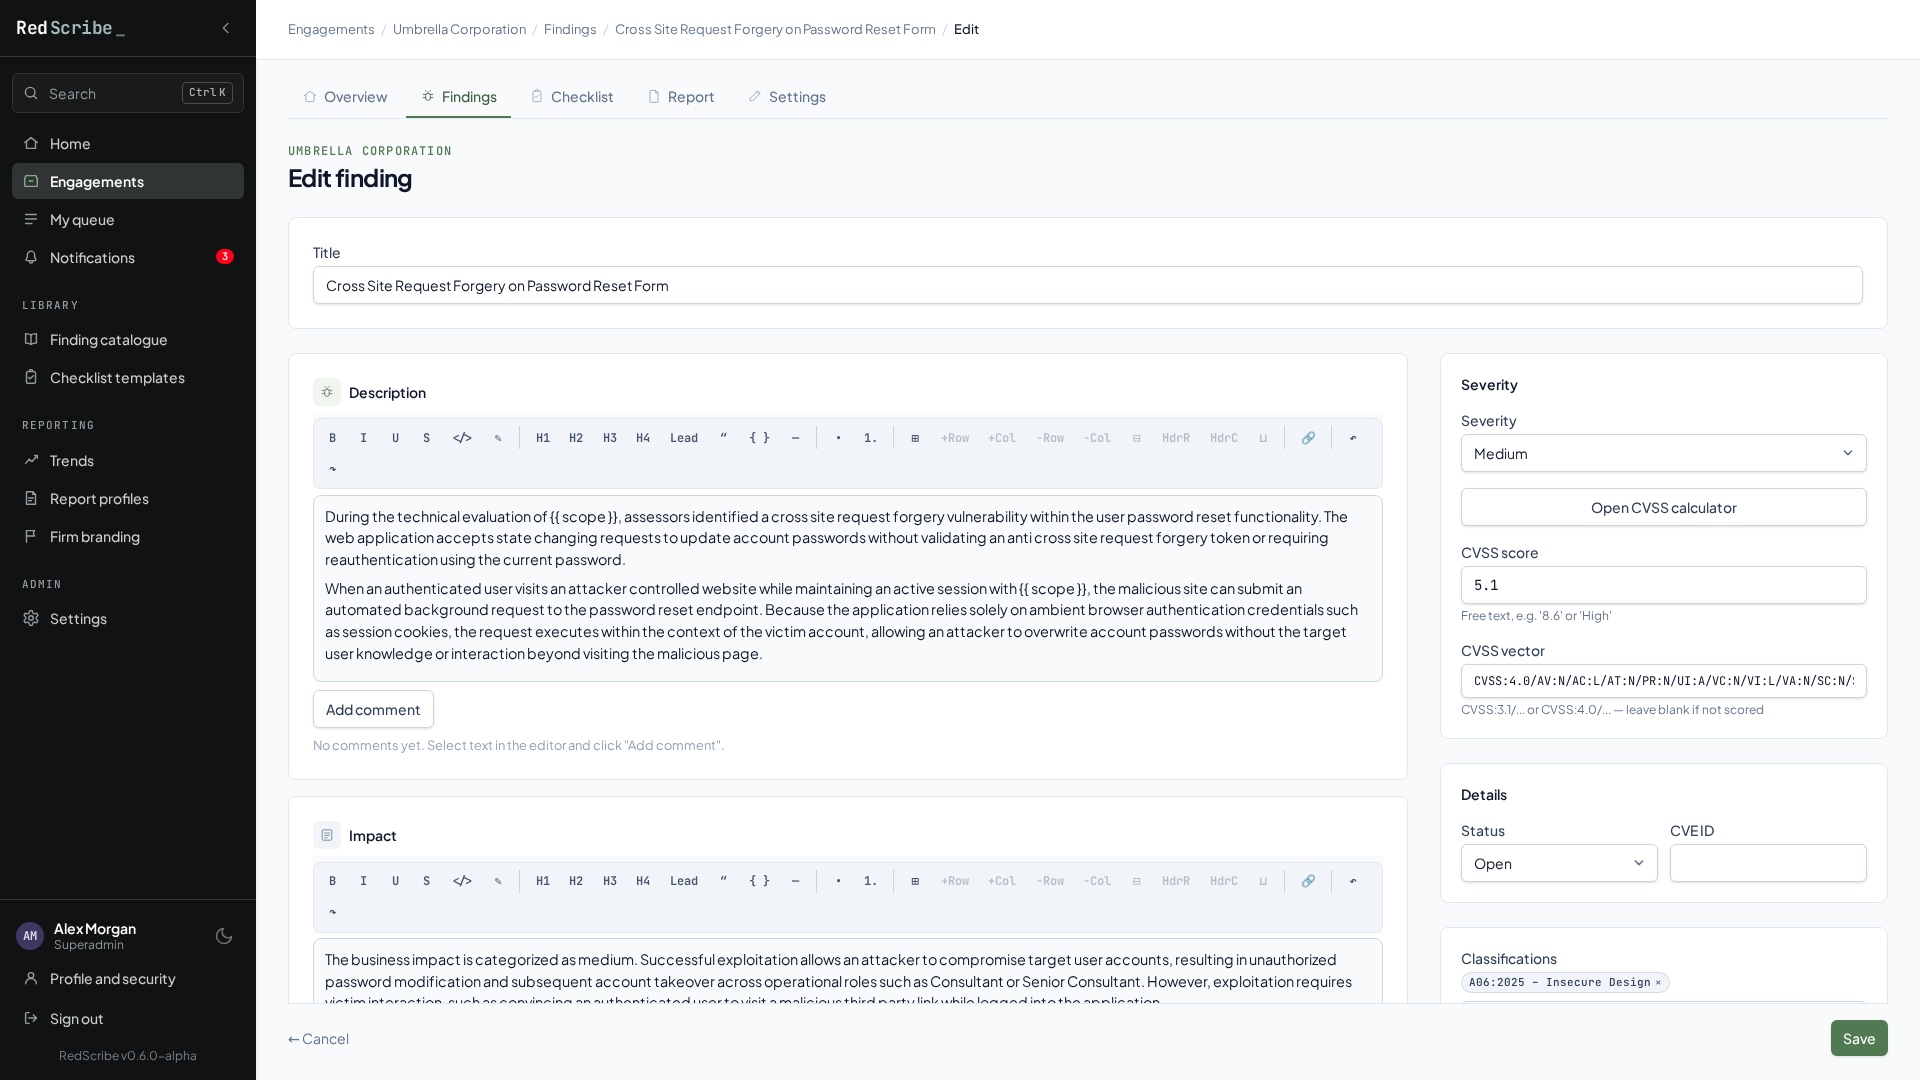
The editor puts the write-up on the left and the finding’s properties (severity, CVSS, status, CVE ID, classifications, affected assets) on the right.
- Title, severity (Critical, High, Medium, Low, or Informational), and status (Open or Closed, whether the issue itself is still present, separate from where it stands in review, below).
- CVSS score and vector, typed or pasted directly, or worked out with the built-in CVSS v3.1 and v4.0 calculator (see below). On save, the score, vector, and severity are cross-checked: the severity has to fall in the score’s band, and a base-only CVSS:3.1 vector has to compute to the score you entered. A mismatch blocks the save and says which part disagrees, so the three can’t drift apart silently.
- CVE ID, if one applies.
- Classifications, tagging the finding against one or more taxonomies,
for example
OWASP Top 10 2021→A01:2021-Broken Access Control. Type a new pair once and it’s offered as a suggestion everywhere else afterward. Classifications are optional: you can create a finding or a catalogue entry without any and add them later. - Content sections, a set of rich text fields such as a description, technical details, or business impact. Which sections exist and in what order is set per instance, not fixed. See Finding structure if you want to change them.
- Affected assets, the hosts or URLs the finding applies to, one per line. Scanner import fills this in automatically when it creates a finding for you.
The CVSS calculator
Section titled “The CVSS calculator”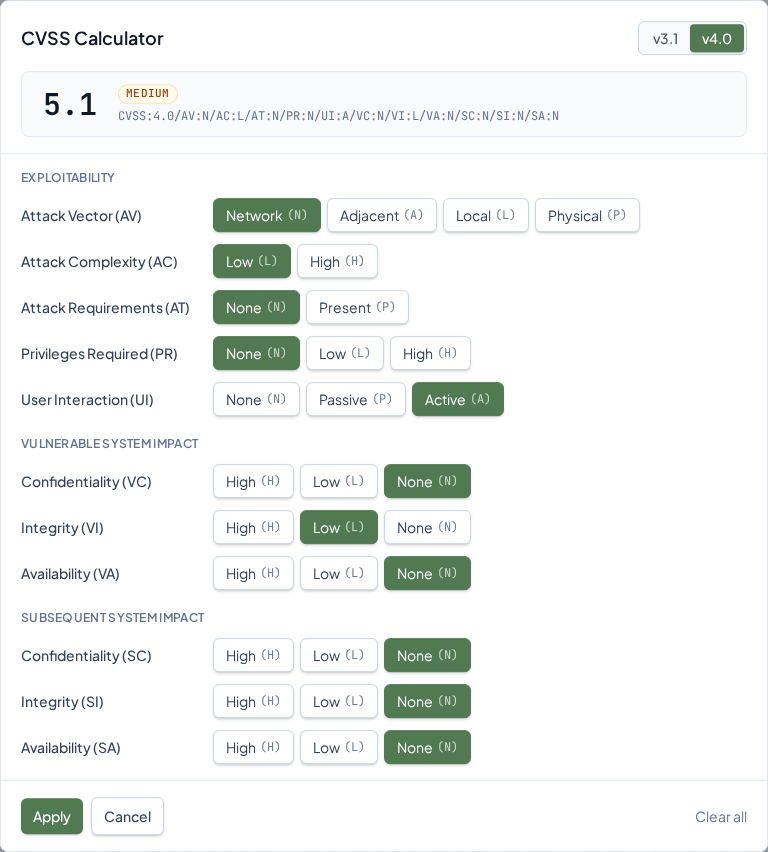
Select Open CVSS calculator, under Severity, to work out a score. Pick v3.1 or v4.0 at the top, then choose one button per metric. The metrics are grouped as they are on FIRST’s own calculators, and hovering a metric or a value explains it. The score, its severity, and the vector update as you go.
Nothing changes on the finding until you select Apply, which fills in the CVSS score and vector and sets the severity to match. Cancel leaves the finding as it was. If the vector field already holds a v3.1 or v4.0 vector, typed or pasted, the calculator opens with it loaded. Catalogue entries use the same calculator for their default CVSS.
The review workflow
Section titled “The review workflow”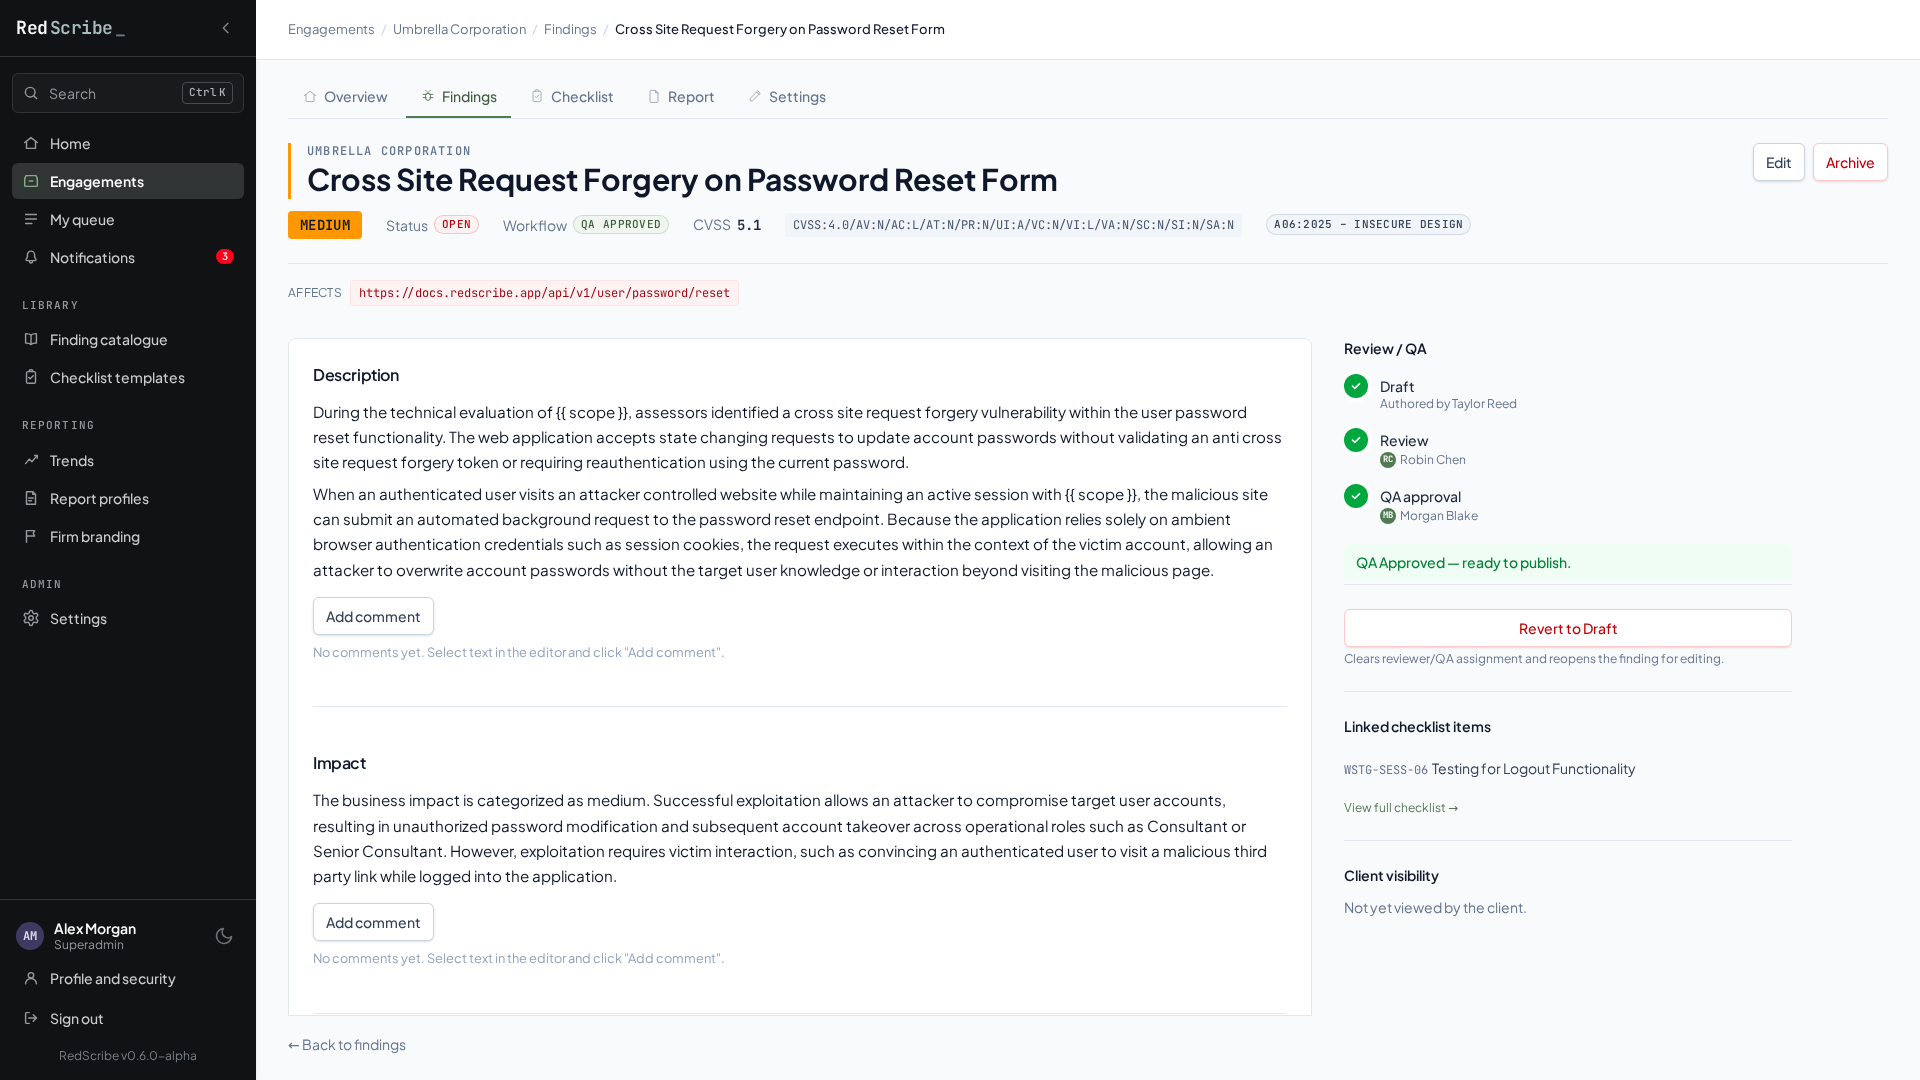
Every finding moves through its own review stage, separate from whether it’s open or closed:
Draft ──submit for review──▶ Reviewed ──submit for QA──▶ QA Approved ▲ │ │ └────── changes requested ─────┘◀──── changes requested ────┘- Draft is where every new finding starts.
- Reviewed means a reviewer has signed off on it. If they instead send it back with feedback, it returns to Draft as Changes Requested (Review).
- QA Approved means a second, independent reviewer has signed off too. A QA rejection sends it back to Draft the same way. Only a QA-approved finding on a released engagement is ever visible in the Client Portal. Nothing earlier in the pipeline reaches a client, ever.
Who can review and QA
Section titled “Who can review and QA”Reviewing and QA-ing findings each need their own permission, and someone can have one without the other. By default a finding’s author can’t review or QA their own work: independence is enforced, and the author is left out of the eligible reviewers and QA for anything they wrote. A separate pair of permissions lifts that block — one for reviewing your own findings, one for QA-ing them — so a small team can self-serve where a larger one keeps the two roles apart. See the Permissions reference for the exact grants if you’re setting up roles.
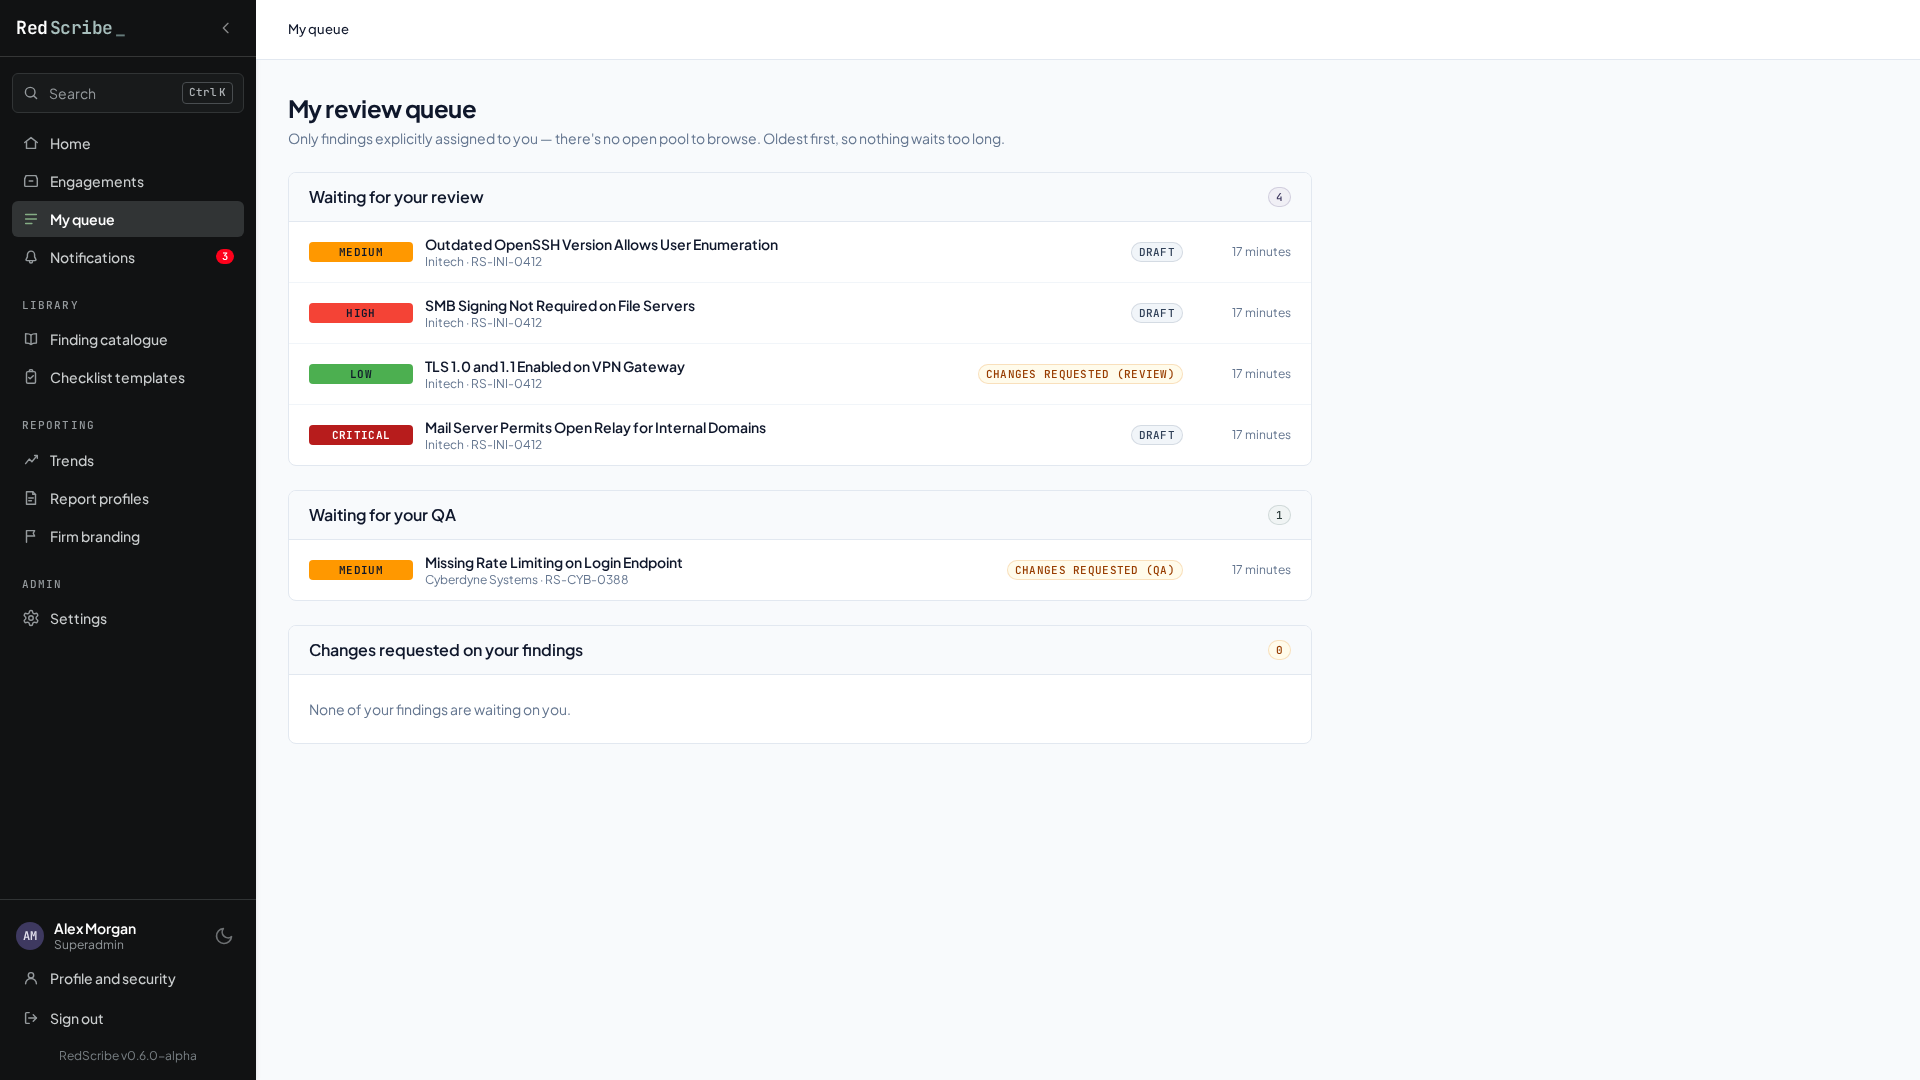
One useful exception: a permission exists that lets someone submit anyone’s review or QA decision, regardless of who it’s actually assigned to. That’s meant for a Team Lead covering for someone who’s out, not for everyday use.
You can also reopen a finding to Draft manually at any point, regardless of its current stage, and assign a reviewer or QA to several findings at once from the findings list rather than one at a time.
Archiving
Section titled “Archiving”Archive and Unarchive work the same as they do on an engagement: a soft delete that sets a finding aside without destroying anything. The findings list splits into Active and Archived tabs, each with its own count; archiving moves a finding from one to the other rather than hiding it from a single list. Archiving is confirmed in a pop-up.
An archived finding is kept out of everything downstream: it never appears in a report export, never reaches the Client Portal, and doesn’t count toward the trend figures or the QA-approval gate on an engagement. It also can’t be retested while archived. Unarchive it to bring it back into all of that.
Retesting
Section titled “Retesting”Once an engagement moves into remediation testing, log a retest record per finding: Not Retested → Fixed / Not Fixed / Partially Fixed / Risk Accepted. That history renders straight into a remediation report automatically, and simply doesn’t appear on a report at all until there’s something to show.
Logging an outcome also moves the finding’s own Open/Closed status to match, so the two never disagree: Fixed closes the finding, Not Fixed or Partially Fixed reopens it, and Risk Accepted leaves the status untouched — it’s a decision, not a fix.
Retest results can only be logged while the engagement is Awaiting Remediation Test or in Remediation Test. Retesting is optional per engagement: from Delivered, either start the remediation test or close the engagement to skip it. A finding’s Retest history section only appears once it has results or can take one.
Comments
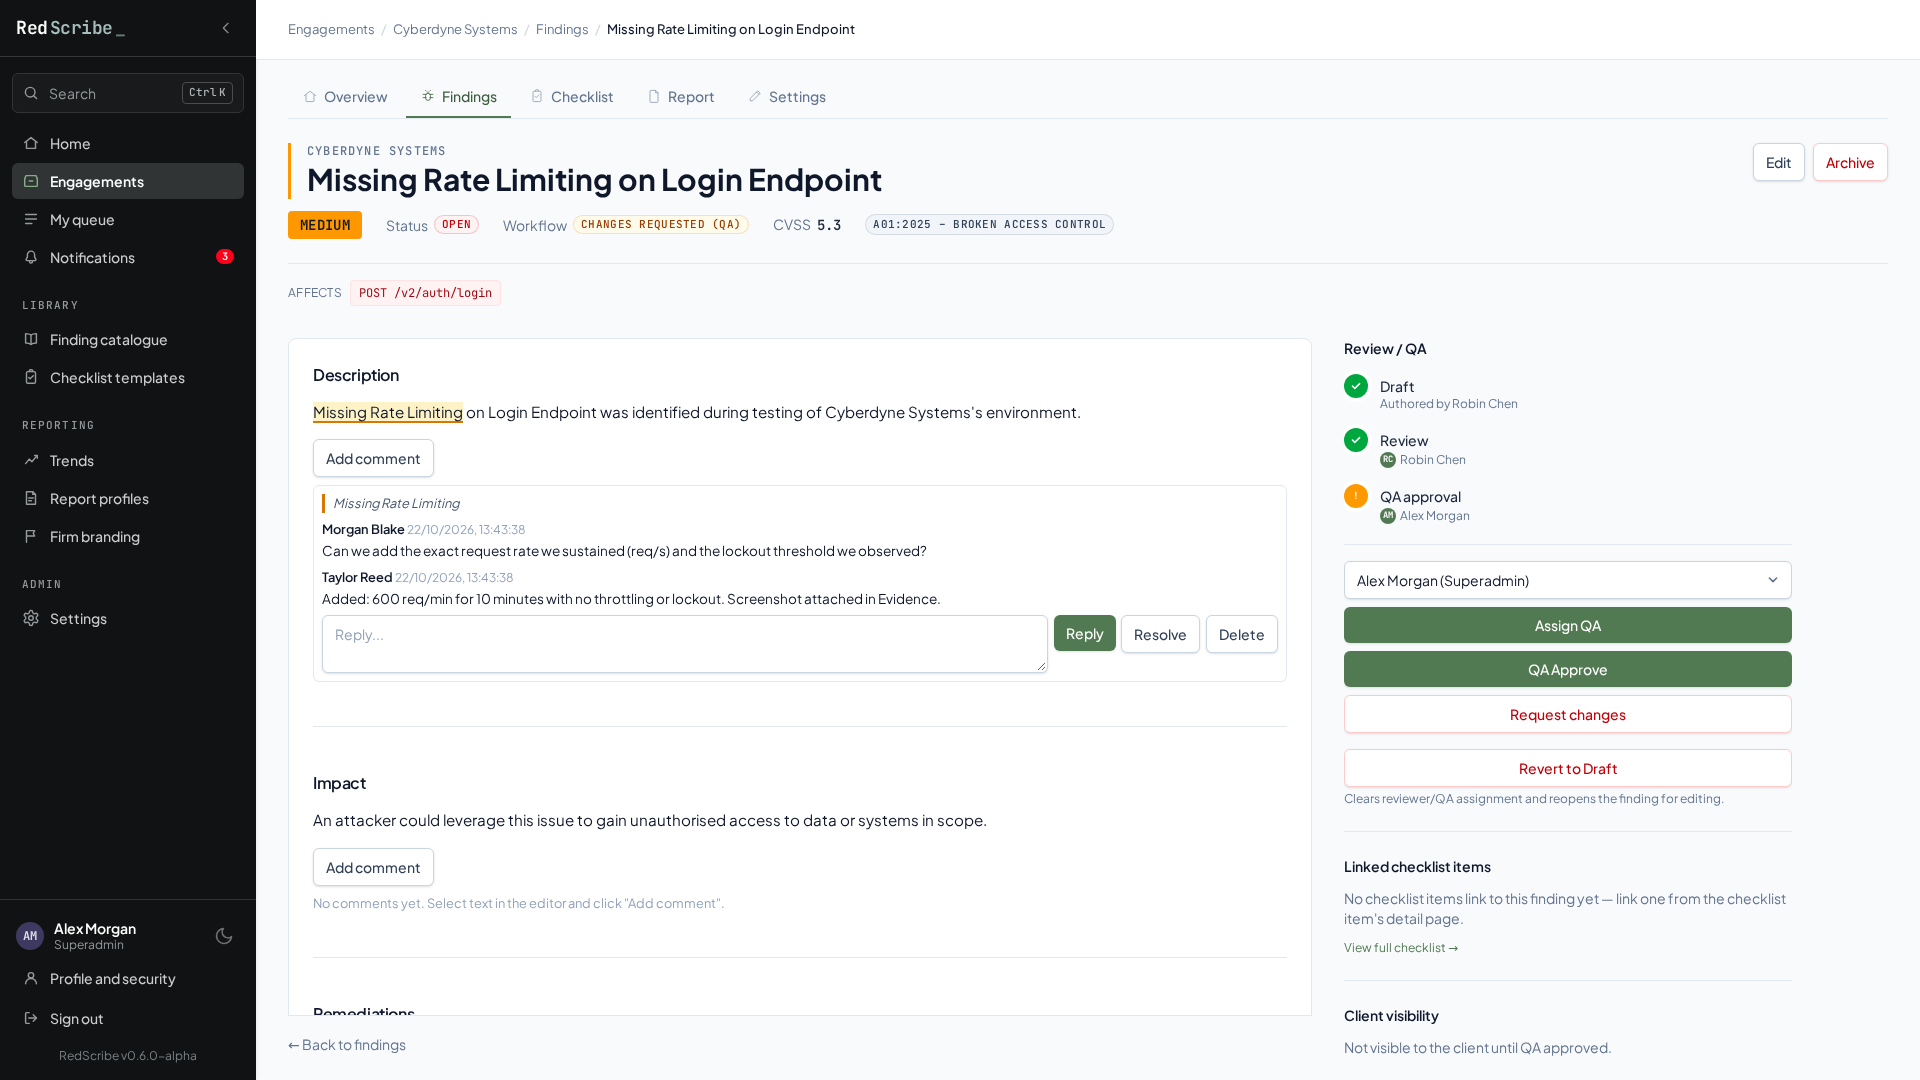
Section titled “Comments”Every rich text field on a finding supports threaded comments anchored to the exact text they’re about. Select the relevant sentence, start a thread, reply, and mark it resolved once it’s addressed. This is how review and QA feedback usually gets attached to the specific thing it’s about, instead of living in a separate note nobody reads in context.
Scanner import
Section titled “Scanner import”Findings can also be created in bulk straight from a scanner’s raw output (Nmap, Burp Suite, Nuclei) instead of one at a time by hand. See Scanner import.